Wednesday, October 24, 2012

Painting Pumpkins With a Six Month Old!


We've been having a lot of fall fun around here! Earlier in the month we went apple picking, we went to a pumpkin patch and the first of several Halloween Parties. I love carving pumpkins, it's one of my favorite parts of the year. I wanted to figure out a way to include H in that fun.

My stroller strides group had a pumpkin painting activity for the little ones that we had to miss. I figured I would recreate the painting experience at home, close to our bathtub. I procured some non-toxic tempera paint, paint brushes, modge-podge spray (since the non-toxic paint is also water soluble) and pumpkins. We've been having beautiful weather so I thought I would set up shop outside - then little H boycotted his nap and ended up falling asleep way early and tonight the weather took a turn for the worst. I wasn't going to let the crazy Colorado weather ruin my fall fun, so I set up shop in the garage. We put H in an old T-shirt and then covered him and the bumbo (without strap) with an old towel.

We let him paint two pumpkins with a little cleaning up in between. For the first pumpkin, I applied the paint to the pumpkin with a sponge brush and let him move it around with his hands. On the second pumpkin, I let him dip his hands in the paint and then tried to aim them at the pumpkin. The first method was much more successful. H loved the feel of the paint and just wanted to put his hands in the paint over and over and over. I was glad we did this at home, close to our washing machine and the bathtub. As soon as he got tired of the activity, he was plucked in the tub and his t-shirt was put in the wash. The paint came right out of both H and our clothing.

Once H was bathed and in bed my artistically inclined sister and I took to the pumpkins. She painted this adorable face, inspired by Tim Burton. I had big plans for using my tulip puff paint to make intricate dots on my pumpkin in a pattern. Unfortunately, the black puff paint must have had a clogged nozzle, because while applying pressure to the bottle the top popped off and went EVERYWHERE. Yes. I made a bigger mess then my 6 month old. With the black paint all over the tarp and only my glow-in-the-dark puff paint left, I decided to stick with something simple. I was able to salvage a bit of the black paint to make a cute little spider. Modge-podge spray was applied to all of the pumpkins and it seems to be helping everything stick, although with the threat of snow, we moved the pumpkins into the garage.

All in all, a very successful activity - H certainly thinks so!


Happy Crafting!

Wednesday, October 17, 2012

Fast & Easy Football Ribbon Wreath


I've been seeing these cute ribbon football wreaths on Pinterest. You can find them for sale on Etsy, but I figured I could just figure out how to make them myself. I purchased the foam wreath from Joann's and wrapped in white ribbon, using hot glue to secure.

Then I started cutting ribbon - lots and lots of ribbon. I picked too much really thick ribbon and ended up having to cut it in half (note: smaller ribbon is better, although you will need more of it.) Some instructions for the wreath suggested that you pin the ribbon on to the wreath. Instead I hot glued all the ribbon into loops - then I hot glued all the loops onto the wreath, until it looked filled out.

I found these little footballs in the wood crafts section of JoAnn's. They were already painted - so I just used a paint pen to add the team name. I originally used hot glue to attach the footballs to a nail. The nail pushed easily into the foam wreath without damaging any of the ribbons. Unfortunately, when I hung the wreath on the door in the hot sun the glue melted and the footballs fell off... so my husband suggested gorilla glue, which worked like a charm.(Some of the wreaths I saw online used clips so the footballs could be removed.) The wreath has been hanging on my door for a few weeks now and is still intact - so it seems gorilla glue was the answer.

This is an easy several hour project that makes a huge statement. You could make this for just about any team or sport you wanted.  The hardest part was finding the right ribbon!


Happy Crafting!

Thursday, October 11, 2012

Our House, Revisited.

Between traveling, visitors and some early snow, we actually found some time to attack a few house projects. My husband likes to call these "my projects" but none of this would get done without his help and in many of these cases, he does most of the work. haha. The house is finally starting to look like ours. (Although I always have more projects up my sleeve.)

Playroom:
Vinyl Decal - Easy to Apply.
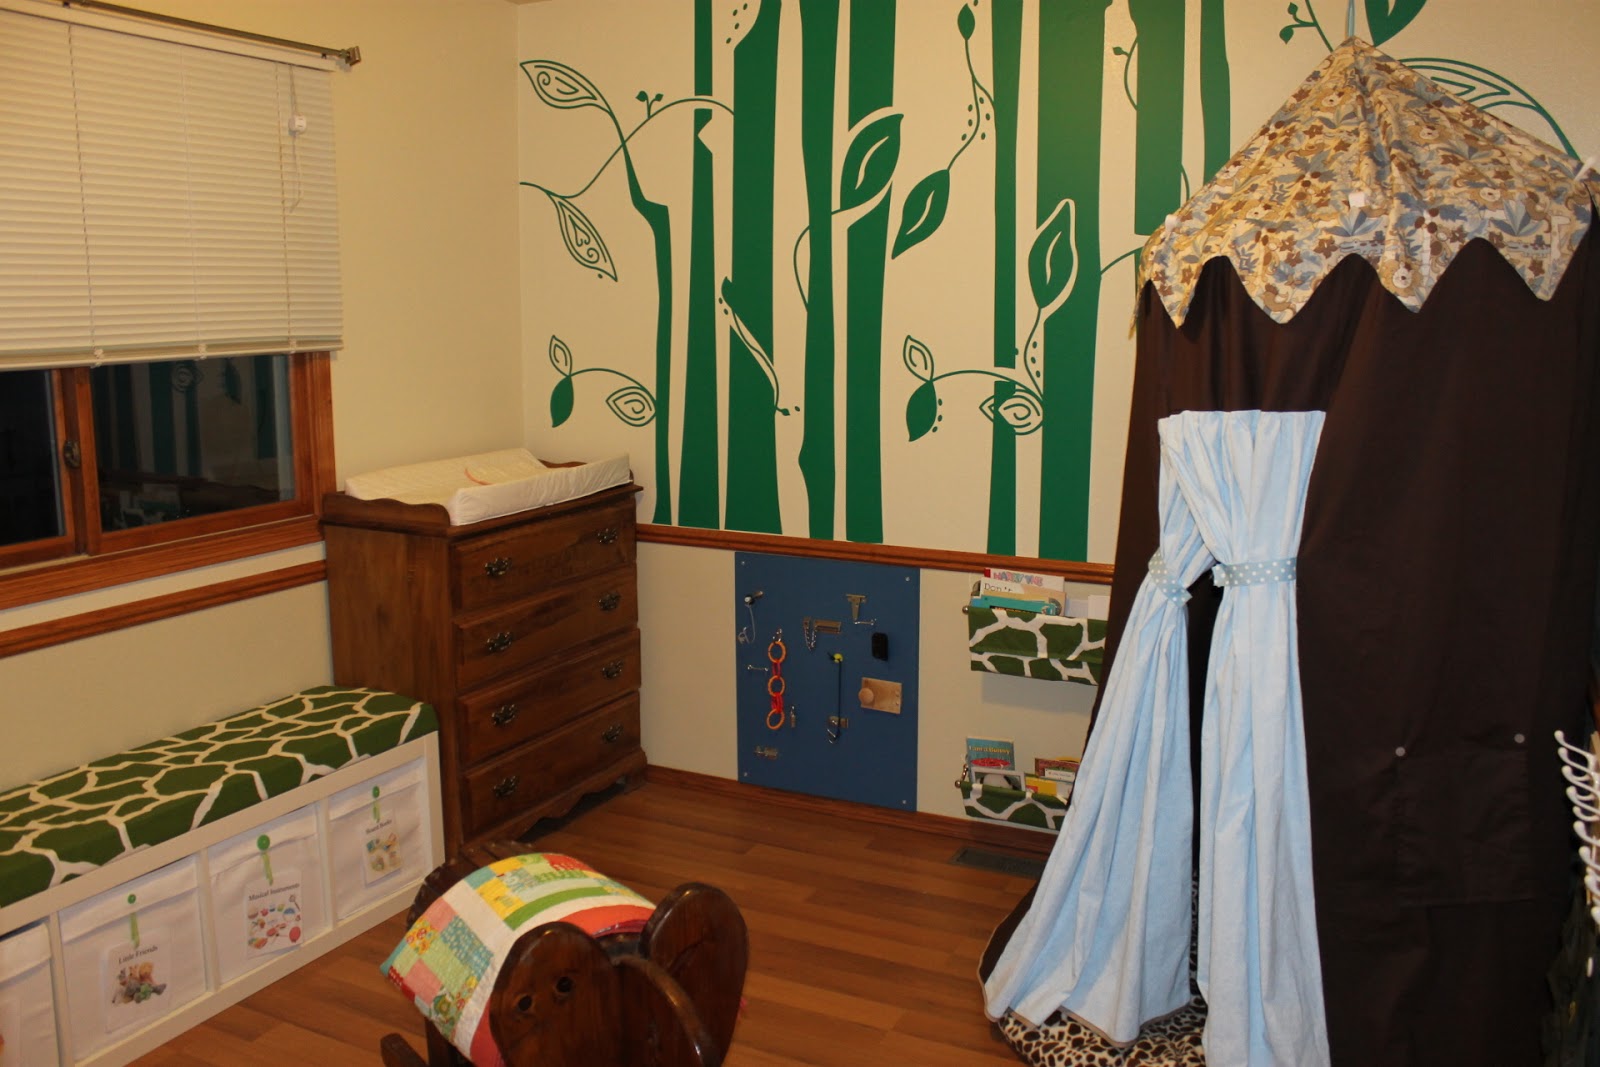
Inspired by I Heart Organizing's birch tree playroom, I set out in search of a stencil or decal that would give it a jungle feel. When this Sissy Little decal came up on Zulily, I jumped on it. I had never worked with a vinyl decal before and it turned out to be easier then I had imagined. The walls in the playroom are textured, and that posed a bit of challenge. The first set of trees we tried to apply as a set of four - that was a mess. Cutting the trees and applying them one by one worked much better. The directions were easy to follow and turned out looking great!

Buttons and Ribbon for Fabric Box Labels
We completed the bench seating a few weeks ago - instructions here. I found fabric bins that I liked at IKEA. I was trying to figure out a way to attach labels to the bins. Velcro did not want to stick and my little one can be pretty hard on items. I found some cute green buttons in a variety of sizes and sewed them on to the front with a small clear button on the back. (The flaps on these bins turn up enough for you to be able to work behind them.) I then printed and laminated labels for each of the bins, hole punched them and used some ribbon to create a loop (using hot glue or a quick stitch) which was then slit and hooked to the small back button. So far so good. We will see if they hold but they look quite cute.

Dress Up Station with Mirrors
 We wanted to create some play stations around the outside of the room. I found some pegs at Home Depot to hang dress-up clothing on. (Please keep in mind my husband installed most of this stuff for me - haha.) I haven't had a chance to make the dress up clothing yet, but I do have this great little ranger vest some dear friends from Edwards gave us. These mirrors are from Wallchart (although I also saw them at Target). Little H loves looking at himself in the lower ones and he will grow to be able to use them all. They were easily hung with the Command picture hanging Velcro tape.

Hardware Activity Board
 My husband put together this great activity board. He has some additional things to add, but with the grandparents coming we wanted to get it up on the wall. We found that little H loves to play with the hardware on our family room coffee table, so this gives him something to play with in his playroom.
(More on this to come, when we get it finished!)

I used the extra fabric from the seating to make some hanging bookshelves. There are lots of instructions for these online. I used towel rods because it seemed easier. I found the towel rods at Amazon.com. I made three pocket shelves in three different sizes to accommodate different sized books.  We ended up hanging the two small ones under the chair rail by the tent and the one large one above the seating. I also added a small pocket to the front of the large one.
Large Towel Rod Bookshelf


Playroom With Tent


Finally - The Tent! I wanted a little fort in the room. Again, there are tons of patterns online. I used a pattern from Simplicity. I had major trouble with the cutting instructions - but was able to just do it my own way with the required fabric. The tent has a great little seating mat and pockets in the back for storing little treasurers.
It hangs from an eye-hook in the ceiling, but we also had to add an additional hook in the back to keep it from rotating sideways. It may actually be easier to just purchase a tent in the future, but it was nice to get the fabric I wanted.

The playroom still needs stuff on the walls and a rug, but it's finally well on its way !


Laundry Room 

Laundry Room Storage
I added some fabric baskets from Target to our laundry room shelves to hold everything. I used some ribbon an card-stock to label the bins. (Since we are cloth diapering, I also have to use the space to dry the diapers when its too cold outside.) This room needs some decoration... I'm still looking for something perfect.


Craft Area
Craft Area.

Hanging Fabric Storage
 This house had the best little craft area in the basement. Unfortunately, once I started setting up, I found that it didn't have a great place to keep fabric. My lovely husband hung some towel rods behind the lowered part of the ceiling. Using pants hangers, I hung my stash fabric so it also blocks some of the sun that comes in through this window in the afternoon. It has freed up quite a bit of much needed shelf space. It also makes me so happy to use my fabric as decoration, because it is so pretty. haha.

We are certainly not done with the house- although we are taking a short break from projects to host Jeff's parents, my sister and my best friend from Atlanta. (Plus a nice break helps me get inspired for my next projects!)

Happy Crafting!

Tuesday, September 11, 2012

2012 Halloween Costume: Penguin Hat & Feet


I honestly had no idea I would find time to finish this costume today. I stared way early thinking it would take me several weeks to find the time to finish this project. Pottery Barn Kids Story Time (or lunch with Jessica) must have really worn H out though because when we got home he took an almost two hour nap and I seized the opportunity to finish his costume.

Again, I just followed the instructions from Ashely over at Make it and Love it, with a few modifications. The hat was easy, although I made two sizes because H was napping and I wasn't sure how it would fit his head. I also sewed all the face pieces on before completing the hat, thus eliminating the need to work inside the hat.

The feet also came together really quickly. Instead of putting the stuffing right into the part I made the shoe a bit more like a slipper. I cut out 6 flipper pieces, instead of four. I made one set of them slightly smaller. I sewed the slightly smaller one together with the one that was going to be the bottom (not the one with the hole) and stuffed that one with batting and closed the hole. Then I followed the directions just as given to attach the piece with the foot hole and the elastic. They are like little felt slippers. H certainly could not walk around in them... but he doesn't walk so it won't be a problem.

I still need to attach the bow tie - but it is made.

I put H in the costume just to make sure everything fit and nothing was going to bother him. He seemed to have a great time playing in the costume - and here are a few pictures of him trying to figure out what his parents had done to him.


(His flipper had fallen off by the time that I took this last one ... haha)

Anyway, after our costume dry-run we got our act together and went to the Pikes Peak Trilake Public Library to get our library cards. They have a huge collection of online music, online books and lots of activities at the library. I think we will be there quite a bit!

I'm hopefully going to get to work on Jeff and my costume next... I'm going to attempt to find a few of the pieces so I don't have to make them all. We shall see.

Happy Crafting!

Monday, September 10, 2012

Halloween Costumes 2012: Penguin

I've been waiting to make H's Halloween Costume since before he was born. We used to pick out our costumes mid-summer so my mom could make them and they were always amazing! (I'll have to see if I can find some old photos of our favorites.)

There are so many good options, but when I saw this little number from Ashley at Make it and Love it, I was hooked. The costume is almost entirely fleece, a great option since it will likely be quite cold here at the end of October. (The fleece was on sale when I went to Joann's last week - bonus!) Plus who can resist a cute little Penguin!

The pattern Ashely provides uses a girls dress as the basis for the pattern. Since H doesn't have a dress, I used a sleep sack he had just outgrown as the template. The only other modification I made was to use a bit of batting in the wings to make them a bit thicker. 

I finished the body this weekend but wanted to check the sizing before I moved on to the slippers and hat.... and I can't resist sharing this picture with you! Its a work in progress, but I think its going to be perfect.


Happy Crafting!

Friends with Babies: List of Activities for Baby and Me


I've never had trouble filling my days -I always have some project in the wings just waiting to get finished. When little H came along, I knew I would need to make use of his nap time and dad time for my crafty endeavors. However, I never gave any thought to what I would do with all the time that H was awake. At our last base, I had a whole group of pregnant friends and friends with kids. I figured my days would be filled with all the activities I was constantly trying to fit in around work - walks with the girls, play-dates, trips to Starbucks... then we moved.

I knew how to make friends before having a baby - work, socials, shopping. Before the baby, I could make plans at a moments notice and do just about everything. Now I have to consider nap times, meal times, and the fact that little H requires at least part of my attention all the time. So new plan. I would have to find a few new mom friends and some new mom-baby activities. 

Luckily, most moms are looking for something similar, so there are a variety of groups that cater to moms looking to hang out with other moms. After a Facebook conversation with one of my best friends (also a new mom), I thought a list of mom-baby activities might be helpful. (Plus this way I will have all the links in one place!)

Most of these national organizations have local chapters that offer a variety of activities. It is certainly about finding the right fit for you and your kid so give them a try- most let you try an activity or two for free. Feel free to add any additional resources you know about. (I'm certainly no expert!)


Military Spouse Clubs - most have a play group or other child friendly options
MOMS Club
MOPS - Mothers of  Preschoolers
La Leche League International -  I haven't been to one of these yet, but I have several friends who loved the breastfeeding support groups.
Stroller Strides - play groups in addition to a whole host of fitness options
Gymboree Classes 
Pottery Barn Kids Story Time - Every Tuesday at 11am with some weekend special events. Call your local store to confirm.
Bring your Baby Matinee - There isn't one here in the springs, but I went in Atlanta and loved the idea that I could bring my baby to the movies with me. I wish this was offered at more theaters.

Public Library - Library story times are our favorite! Since I can't link to all the public libraries here are my favorites from the places we have been this summer: Pikes Peak Library District (Colorado Springs), USAFA Base Library, Hampstead Public Library (Montgomery, AL),  Fulton County Library (Atlanta, GA)

YMCA  - The Pikes Peak YMCA's offer 2 hours of child care so you can work out (something the base gyms don't offer) as well as a variety of classes for children, families, and individuals. H and I will hopefully be taking a swimming class very soon!

Montgomery Zoo - This place deserves (and will hopefully get) its whole own blog post at Out of Edwards. They have great activities for families and kids, in addition to the normal fun you would have at the zoo. I can't wait for H to be old enough to try out one of their Stroller Safari's. Again, check out your local zoo because they are bound to have these type of activities.

A special thanks to everyone who has helped me fill my days with activities H and I can both enjoy.

This is stating the obvious, but nights away from the little ones really do make the heart grow fonder ... so don't discard those activates you enjoyed before baby either. Now I just need to find a good babysitter! 

Sunday, September 9, 2012

Making a House a Home

I've finally found a bit of time to share a few of the projects we have undertaken in the first month in Colorado Springs. I have some big "plans"  (aka Pinterest boards galore) for the house and have come to terms with the fact that it is going to take me a while to get everything just how I want it. So far we have had 6 house guests and I've changed a few things between each of their visits.  Also, I've been putting this off because we have been without end tables... but on Saturday we found three perfect ones!

It's my blog, so I only have to show you the rooms I'm done with and you can just wait and see on the other rooms. Without further ado...

The Playroom 

 This is one of the rooms that has a whole Pinterest board dedicated to it, but I am so impressed by how this little project turned out, I had to post it! Here are the instructions from i heart organizing.

My bench is actually one block shorter then the one from Jen's blog. We had an issue with size and covering heating vents. I wanted the bench under the window, so instead of building a wooden corner piece we just overlapped the shelves - we have 9 storage spaces instead of 10. The storage bins are fabric and from Ikea. Jen used the plastic ones from Ikea, but I didn't love the feel of them.  The fabric fit our purpose for now and are better since H is less likely to hurt himself on them.

The pillows are from a previous post and were in the nursery in the last house.  A few items have been re-purposed, including the diaper holder.

We have switched to cloth diapering and love it. However, now I don't need a diaper stacker. It has instead become a place to store some of H's animal friends and it fits our jungle theme for the play room! I have a lot of work left to do in this room, but at least now I have a place to sit while H plays on the floor and have plenty of storage space for toys.

The Family Room 

This is currently my favorite room in the house. I love how we all fit in it. Jeff can be watching football, H playing on the floor and I can sit by the window to read - all without tripping over each other. (Can you tell I was in base housing for too long! haha.)

The major project here was the wooden curtain holder over the big window. (I had to close the shades for the picture, but it has a beautiful view of the mountains.) The former owners had really dark fabrics up on these valances. I loved the polished look of the wood, but hated the fabric choice. In this room I used valances from our old house and reupholsterd it. (Thanks to my husband's staple gun, it was an easy fix.)  I'm not sure about what I want on the mantle yet, and I'm considering finishing the mantle so that it extends to the floor, but for now its nice to have a living space that feels finished.

The Nook 

This little nook is right outside our bedroom. I couldn't figure out what in the world I would do with the nook until I saw this piece of art at Pier One. I'm still debating if I love the vase there, but otherwise I love how well this piece fits there.

The Nursery 

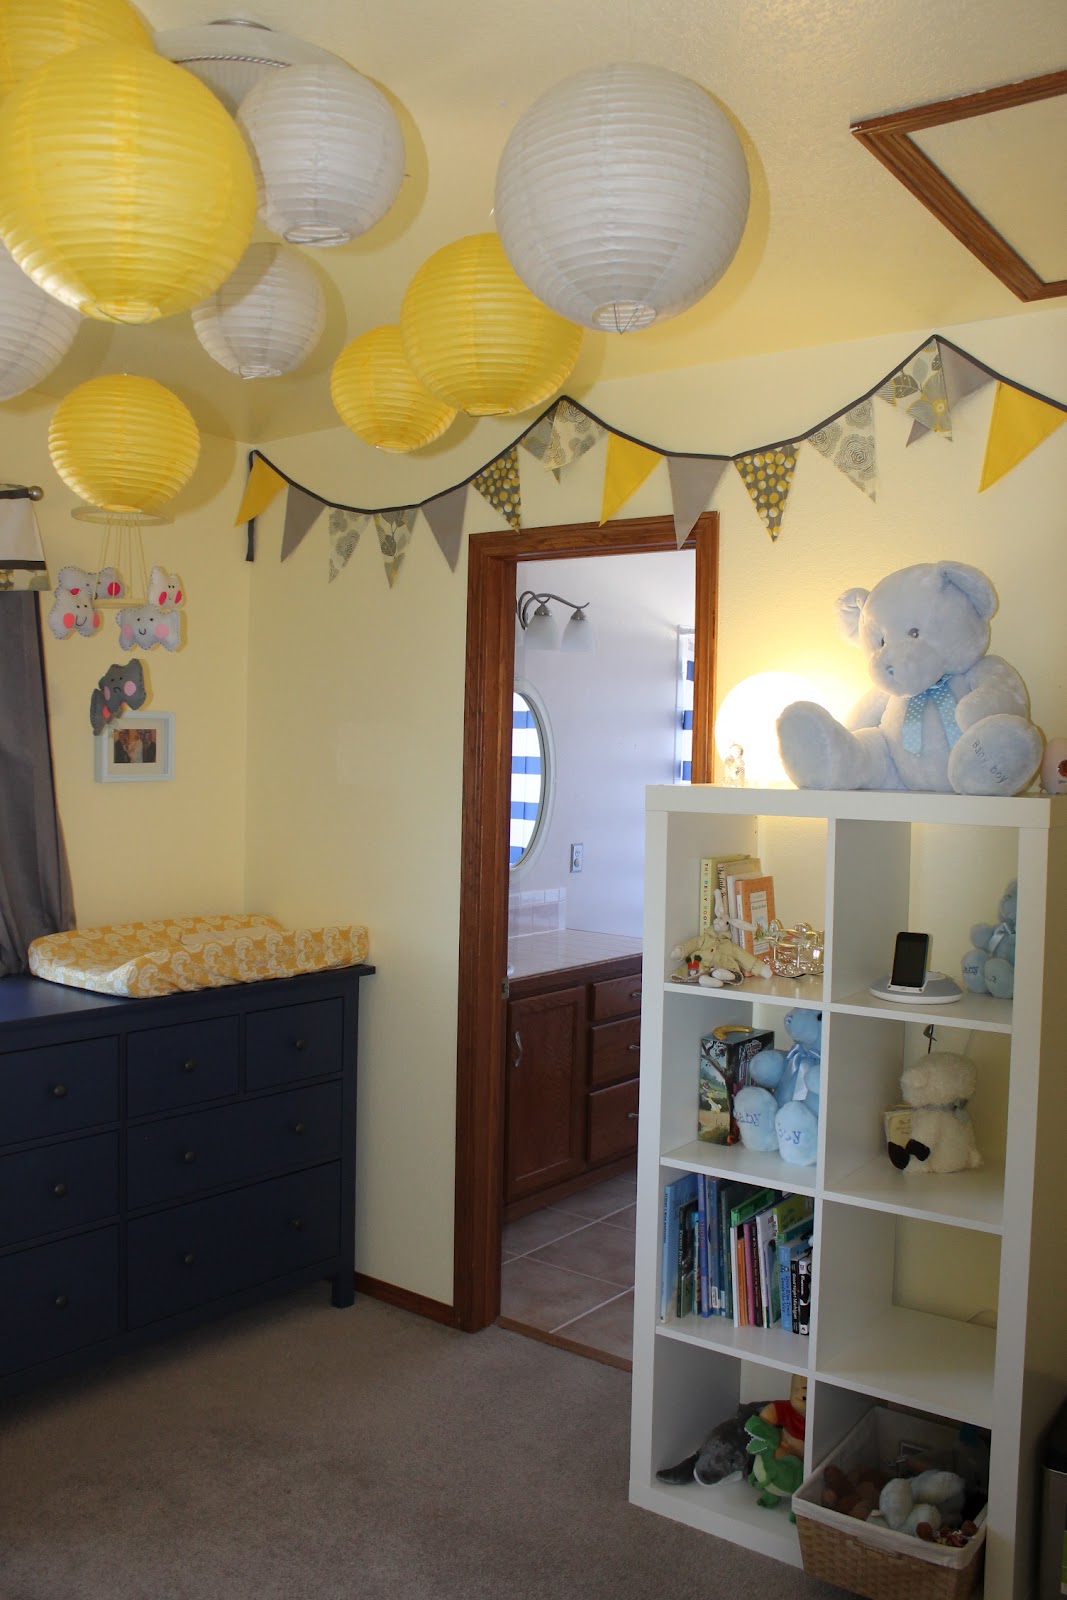
I am so happy with how this room came together. The room was already painted yellow when we got the house. I was able to use a bunch of things that B from Practically Crafty made for my shower. I converted the table runner she made into a valance, I used the flags as wall decor and reused the lanterns.

I love the little collection of things over his crib - from invitations and pictures to little hand written notes, it really brings H's personality to the room. And I know you are not suppose to have bumpers! By 4 months, H was rolling all over the place and we were constantly finding him with an arm or leg between the slats... so bumpers it was. I tried the "breathable bumpers" and hated how they looked and how they felt. H was able to get stuck between them and the mattress because of how they connected. They also said "one size fits all" but we never got them to fit quite right in our crib. These bumpers are excellent and are from Carousel Designs. They are beautiful and lined with the softest fabric - we have had them for a few weeks now and love them.

I have one little spot on the wall there by the bathroom door that needs a little something... too many cute options, so I'm sure I will find something cute.

H's Closet

Another find from I heart Organizing. Jen had used an Ikea Expedit bookshelf to add additional space in her boy's closets. (See her blog for instructions.) We needed the additional storage and hanging room. The built-in wood shelf made the Expedit too tall for this closet. Instead we used the Expedit 2x2 shelf with amazing results. The extra hanging room is perfect and leaves us with four shelves that H will eventually be able to reach. When H is a bit older, I plan to add storage like Jen did in her tutorial.

Here is another close up:


As you can see, we have been quite busy. I have a handful of other projects up my sleeves so I'll keep you posted. I also have been hard at work on H's halloween costume and hope to have a preview of that soon. Until then... Happy Crafting! (and one last picture of H!)