Tuesday, September 11, 2012
2012 Halloween Costume: Penguin Hat & Feet
I honestly had no idea I would find time to finish this costume today. I stared way early thinking it would take me several weeks to find the time to finish this project. Pottery Barn Kids Story Time (or lunch with Jessica) must have really worn H out though because when we got home he took an almost two hour nap and I seized the opportunity to finish his costume.
Again, I just followed the instructions from Ashely over at Make it and Love it, with a few modifications. The hat was easy, although I made two sizes because H was napping and I wasn't sure how it would fit his head. I also sewed all the face pieces on before completing the hat, thus eliminating the need to work inside the hat.
The feet also came together really quickly. Instead of putting the stuffing right into the part I made the shoe a bit more like a slipper. I cut out 6 flipper pieces, instead of four. I made one set of them slightly smaller. I sewed the slightly smaller one together with the one that was going to be the bottom (not the one with the hole) and stuffed that one with batting and closed the hole. Then I followed the directions just as given to attach the piece with the foot hole and the elastic. They are like little felt slippers. H certainly could not walk around in them... but he doesn't walk so it won't be a problem.
I still need to attach the bow tie - but it is made.
I put H in the costume just to make sure everything fit and nothing was going to bother him. He seemed to have a great time playing in the costume - and here are a few pictures of him trying to figure out what his parents had done to him.
(His flipper had fallen off by the time that I took this last one ... haha)
Anyway, after our costume dry-run we got our act together and went to the Pikes Peak Trilake Public Library to get our library cards. They have a huge collection of online music, online books and lots of activities at the library. I think we will be there quite a bit!
I'm hopefully going to get to work on Jeff and my costume next... I'm going to attempt to find a few of the pieces so I don't have to make them all. We shall see.
Happy Crafting!
Monday, September 10, 2012
Halloween Costumes 2012: Penguin
I've been waiting to make H's Halloween Costume since before he was born. We used to pick out our costumes mid-summer so my mom could make them and they were always amazing! (I'll have to see if I can find some old photos of our favorites.)
There are so many good options, but when I saw this little number from Ashley at Make it and Love it, I was hooked. The costume is almost entirely fleece, a great option since it will likely be quite cold here at the end of October. (The fleece was on sale when I went to Joann's last week - bonus!) Plus who can resist a cute little Penguin!
The pattern Ashely provides uses a girls dress as the basis for the pattern. Since H doesn't have a dress, I used a sleep sack he had just outgrown as the template. The only other modification I made was to use a bit of batting in the wings to make them a bit thicker.
I finished the body this weekend but wanted to check the sizing before I moved on to the slippers and hat.... and I can't resist sharing this picture with you! Its a work in progress, but I think its going to be perfect.
Happy Crafting!
There are so many good options, but when I saw this little number from Ashley at Make it and Love it, I was hooked. The costume is almost entirely fleece, a great option since it will likely be quite cold here at the end of October. (The fleece was on sale when I went to Joann's last week - bonus!) Plus who can resist a cute little Penguin!
The pattern Ashely provides uses a girls dress as the basis for the pattern. Since H doesn't have a dress, I used a sleep sack he had just outgrown as the template. The only other modification I made was to use a bit of batting in the wings to make them a bit thicker.
I finished the body this weekend but wanted to check the sizing before I moved on to the slippers and hat.... and I can't resist sharing this picture with you! Its a work in progress, but I think its going to be perfect.
Happy Crafting!
Friends with Babies: List of Activities for Baby and Me
I've never had trouble filling my days -I always have some project in the wings just waiting to get finished. When little H came along, I knew I would need to make use of his nap time and dad time for my crafty endeavors. However, I never gave any thought to what I would do with all the time that H was awake. At our last base, I had a whole group of pregnant friends and friends with kids. I figured my days would be filled with all the activities I was constantly trying to fit in around work - walks with the girls, play-dates, trips to Starbucks... then we moved.
I knew how to make friends before having a baby - work, socials, shopping. Before the baby, I could make plans at a moments notice and do just about everything. Now I have to consider nap times, meal times, and the fact that little H requires at least part of my attention all the time. So new plan. I would have to find a few new mom friends and some new mom-baby activities.
Luckily, most moms are looking for something similar, so there are a variety of groups that cater to moms looking to hang out with other moms. After a Facebook conversation with one of my best friends (also a new mom), I thought a list of mom-baby activities might be helpful. (Plus this way I will have all the links in one place!)
Most of these national organizations have local chapters that offer a variety of activities. It is certainly about finding the right fit for you and your kid so give them a try- most let you try an activity or two for free. Feel free to add any additional resources you know about. (I'm certainly no expert!)
Military Spouse Clubs - most have a play group or other child friendly options
MOMS Club
MOPS - Mothers of Preschoolers
La Leche League International - I haven't been to one of these yet, but I have several friends who loved the breastfeeding support groups.
Stroller Strides - play groups in addition to a whole host of fitness options
Gymboree Classes
Pottery Barn Kids Story Time - Every Tuesday at 11am with some weekend special events. Call your local store to confirm.
Bring your Baby Matinee - There isn't one here in the springs, but I went in Atlanta and loved the idea that I could bring my baby to the movies with me. I wish this was offered at more theaters.
Public Library - Library story times are our favorite! Since I can't link to all the public libraries here are my favorites from the places we have been this summer: Pikes Peak Library District (Colorado Springs), USAFA Base Library, Hampstead Public Library (Montgomery, AL), Fulton County Library (Atlanta, GA)
YMCA - The Pikes Peak YMCA's offer 2 hours of child care so you can work out (something the base gyms don't offer) as well as a variety of classes for children, families, and individuals. H and I will hopefully be taking a swimming class very soon!
Montgomery Zoo - This place deserves (and will hopefully get) its whole own blog post at Out of Edwards. They have great activities for families and kids, in addition to the normal fun you would have at the zoo. I can't wait for H to be old enough to try out one of their Stroller Safari's. Again, check out your local zoo because they are bound to have these type of activities.
A special thanks to everyone who has helped me fill my days with activities H and I can both enjoy.
This is stating the obvious, but nights away from the little ones really do make the heart grow fonder ... so don't discard those activates you enjoyed before baby either. Now I just need to find a good babysitter!
Sunday, September 9, 2012
Making a House a Home
I've finally found a bit of time to share a few of the projects we have undertaken in the first month in Colorado Springs. I have some big "plans" (aka Pinterest boards galore) for the house and have come to terms with the fact that it is going to take me a while to get everything just how I want it. So far we have had 6 house guests and I've changed a few things between each of their visits. Also, I've been putting this off because we have been without end tables... but on Saturday we found three perfect ones!
It's my blog, so I only have to show you the rooms I'm done with and you can just wait and see on the other rooms. Without further ado...
This is one of the rooms that has a whole Pinterest board dedicated to it, but I am so impressed by how this little project turned out, I had to post it! Here are the instructions from i heart organizing.
My bench is actually one block shorter then the one from Jen's blog. We had an issue with size and covering heating vents. I wanted the bench under the window, so instead of building a wooden corner piece we just overlapped the shelves - we have 9 storage spaces instead of 10. The storage bins are fabric and from Ikea. Jen used the plastic ones from Ikea, but I didn't love the feel of them. The fabric fit our purpose for now and are better since H is less likely to hurt himself on them.
The pillows are from a previous post and were in the nursery in the last house. A few items have been re-purposed, including the diaper holder.
We have switched to cloth diapering and love it. However, now I don't need a diaper stacker. It has instead become a place to store some of H's animal friends and it fits our jungle theme for the play room! I have a lot of work left to do in this room, but at least now I have a place to sit while H plays on the floor and have plenty of storage space for toys.
This is currently my favorite room in the house. I love how we all fit in it. Jeff can be watching football, H playing on the floor and I can sit by the window to read - all without tripping over each other. (Can you tell I was in base housing for too long! haha.)
The major project here was the wooden curtain holder over the big window. (I had to close the shades for the picture, but it has a beautiful view of the mountains.) The former owners had really dark fabrics up on these valances. I loved the polished look of the wood, but hated the fabric choice. In this room I used valances from our old house and reupholsterd it. (Thanks to my husband's staple gun, it was an easy fix.) I'm not sure about what I want on the mantle yet, and I'm considering finishing the mantle so that it extends to the floor, but for now its nice to have a living space that feels finished.
This little nook is right outside our bedroom. I couldn't figure out what in the world I would do with the nook until I saw this piece of art at Pier One. I'm still debating if I love the vase there, but otherwise I love how well this piece fits there.
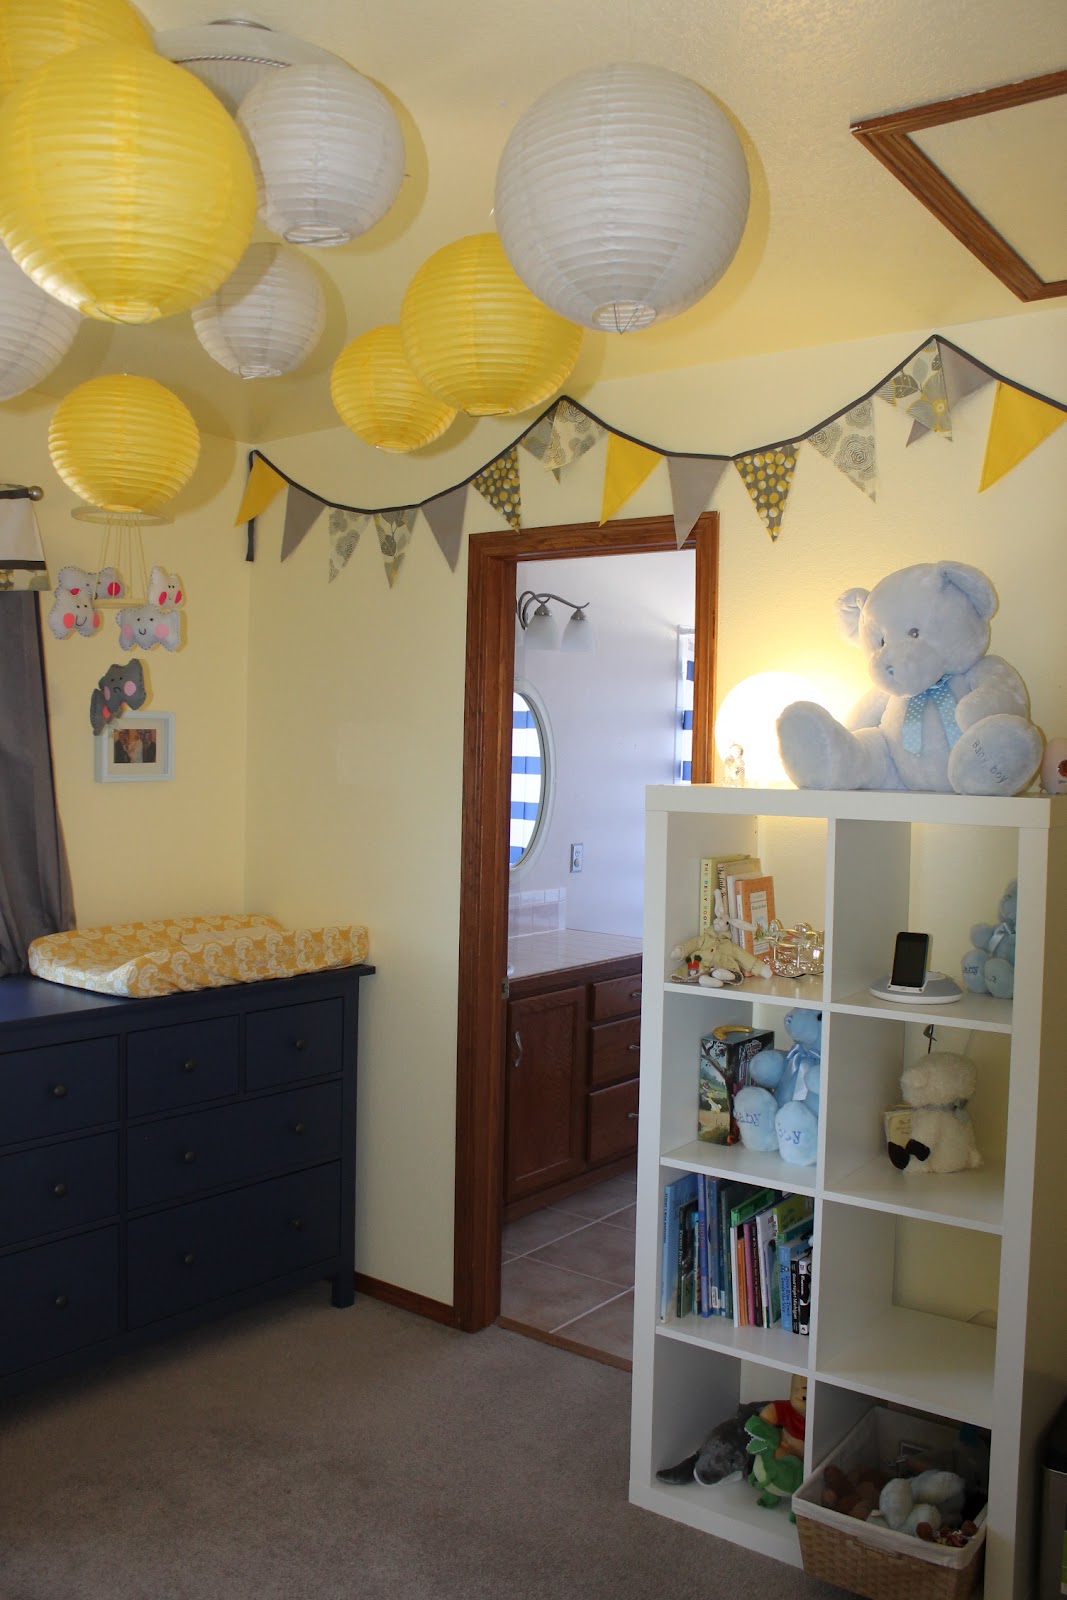
I am so happy with how this room came together. The room was already painted yellow when we got the house. I was able to use a bunch of things that B from Practically Crafty made for my shower. I converted the table runner she made into a valance, I used the flags as wall decor and reused the lanterns.
I love the little collection of things over his crib - from invitations and pictures to little hand written notes, it really brings H's personality to the room. And I know you are not suppose to have bumpers! By 4 months, H was rolling all over the place and we were constantly finding him with an arm or leg between the slats... so bumpers it was. I tried the "breathable bumpers" and hated how they looked and how they felt. H was able to get stuck between them and the mattress because of how they connected. They also said "one size fits all" but we never got them to fit quite right in our crib. These bumpers are excellent and are from Carousel Designs. They are beautiful and lined with the softest fabric - we have had them for a few weeks now and love them.
I have one little spot on the wall there by the bathroom door that needs a little something... too many cute options, so I'm sure I will find something cute.
Another find from I heart Organizing. Jen had used an Ikea Expedit bookshelf to add additional space in her boy's closets. (See her blog for instructions.) We needed the additional storage and hanging room. The built-in wood shelf made the Expedit too tall for this closet. Instead we used the Expedit 2x2 shelf with amazing results. The extra hanging room is perfect and leaves us with four shelves that H will eventually be able to reach. When H is a bit older, I plan to add storage like Jen did in her tutorial.
Here is another close up:
As you can see, we have been quite busy. I have a handful of other projects up my sleeves so I'll keep you posted. I also have been hard at work on H's halloween costume and hope to have a preview of that soon. Until then... Happy Crafting! (and one last picture of H!)
It's my blog, so I only have to show you the rooms I'm done with and you can just wait and see on the other rooms. Without further ado...
The Playroom
This is one of the rooms that has a whole Pinterest board dedicated to it, but I am so impressed by how this little project turned out, I had to post it! Here are the instructions from i heart organizing.
My bench is actually one block shorter then the one from Jen's blog. We had an issue with size and covering heating vents. I wanted the bench under the window, so instead of building a wooden corner piece we just overlapped the shelves - we have 9 storage spaces instead of 10. The storage bins are fabric and from Ikea. Jen used the plastic ones from Ikea, but I didn't love the feel of them. The fabric fit our purpose for now and are better since H is less likely to hurt himself on them.
The pillows are from a previous post and were in the nursery in the last house. A few items have been re-purposed, including the diaper holder.
We have switched to cloth diapering and love it. However, now I don't need a diaper stacker. It has instead become a place to store some of H's animal friends and it fits our jungle theme for the play room! I have a lot of work left to do in this room, but at least now I have a place to sit while H plays on the floor and have plenty of storage space for toys.
The Family Room
This is currently my favorite room in the house. I love how we all fit in it. Jeff can be watching football, H playing on the floor and I can sit by the window to read - all without tripping over each other. (Can you tell I was in base housing for too long! haha.)
The major project here was the wooden curtain holder over the big window. (I had to close the shades for the picture, but it has a beautiful view of the mountains.) The former owners had really dark fabrics up on these valances. I loved the polished look of the wood, but hated the fabric choice. In this room I used valances from our old house and reupholsterd it. (Thanks to my husband's staple gun, it was an easy fix.) I'm not sure about what I want on the mantle yet, and I'm considering finishing the mantle so that it extends to the floor, but for now its nice to have a living space that feels finished.
The Nook
This little nook is right outside our bedroom. I couldn't figure out what in the world I would do with the nook until I saw this piece of art at Pier One. I'm still debating if I love the vase there, but otherwise I love how well this piece fits there.
The Nursery
I am so happy with how this room came together. The room was already painted yellow when we got the house. I was able to use a bunch of things that B from Practically Crafty made for my shower. I converted the table runner she made into a valance, I used the flags as wall decor and reused the lanterns.
I love the little collection of things over his crib - from invitations and pictures to little hand written notes, it really brings H's personality to the room. And I know you are not suppose to have bumpers! By 4 months, H was rolling all over the place and we were constantly finding him with an arm or leg between the slats... so bumpers it was. I tried the "breathable bumpers" and hated how they looked and how they felt. H was able to get stuck between them and the mattress because of how they connected. They also said "one size fits all" but we never got them to fit quite right in our crib. These bumpers are excellent and are from Carousel Designs. They are beautiful and lined with the softest fabric - we have had them for a few weeks now and love them.
I have one little spot on the wall there by the bathroom door that needs a little something... too many cute options, so I'm sure I will find something cute.
H's Closet
Another find from I heart Organizing. Jen had used an Ikea Expedit bookshelf to add additional space in her boy's closets. (See her blog for instructions.) We needed the additional storage and hanging room. The built-in wood shelf made the Expedit too tall for this closet. Instead we used the Expedit 2x2 shelf with amazing results. The extra hanging room is perfect and leaves us with four shelves that H will eventually be able to reach. When H is a bit older, I plan to add storage like Jen did in her tutorial.
Here is another close up:
As you can see, we have been quite busy. I have a handful of other projects up my sleeves so I'll keep you posted. I also have been hard at work on H's halloween costume and hope to have a preview of that soon. Until then... Happy Crafting! (and one last picture of H!)
Tuesday, August 14, 2012
Jewelry Organizer out of a Silverware Tray and Other Pinterest Projects
My husband has been engaging in the larger projects, necessitating many trips to our local Home Depot. (Home Depot offers a lovely military discount and allows you to register your ID card so you don't have to show it every time and have a manger come over to approve it.) Anyway, so far he has converted our dryer from a more modern four prong to a three prong to fit into the plug at the new house, installed a clothes line out back at a height that will prevent anyone from getting strangled, and most recently installed a whole house humidifier! (At the time of writing the whole house humidifier was mostly installed - we are missing a crucial bolt that will require another trip to the HD. I have complete faith that it will be complete tomorrow though.)
Little H has been busy as well. He was joyfully reunited with all his toys and has started rolling over since arriving at the new house!
Meanwhile I have tackled a few small projects I have had on my list.
I printed a meal planner I found on Pinterest, framed it in a document frame and hung it in the kitchen. I use a wet erase marker to plan the weeks meals for all to see. (This way my husband can voice his concern and preference over a meal choice before dinner is on table.) We have a lively little farmers market we walk to on Saturdays. Through October, I will be able to walk there and then meal plan and hit the Grocery on Sunday so I can take on the week in an organized fashion.
Second, I created a weekly chore chart. It also found a home in a document frame. This one is out of sight in the laundry room, where I can check off activities with a dry erase marker. Since I'm at home with the little one and this house is larger than our Edwards AFB home, I figured I may need some structure to my cleaning. There were lots of examples on Pinterest that are easily modified. I had to make sure to include my every other day cloth diaper washing in the schedule.
Finally, the jewelry organizer. Another Pinterest find that was perfect for my new closet. Much like the original pinner, I have quite a bit of costume jewelry. When it was relegated to a drawer, I would forget I had it - so this not only looks pretty, it reminds me of what I have when I'm putting an outfit together. I keeps all my easily tarnished pieces in the aforementioned drawer, but now they don't have to fight for space. These pieces fit into a lined organizer I found at Everything Organized a few years ago.
I started with two wooden silverware trays, spray painted them white (two coats), added hooks and secured then to the wall. Ok. Ok. Actually I "supervised" my husband doing most of that, but I did hang the jewelry up myself.
I followed the directions from this blog. The wood did not take the hooks well, so pilot holes needed to be drilled. While screwing in the hooks, both of my boxes cracked, but it was easily repaired (by my husband) with wood glue.
Anyway, I love it! I can't wait to start on my next set of projects. Happy Crafting!
Thursday, July 19, 2012
Peanut Butter Goodness
As you know, I'm stuck in TLF (Temproary Living Facility) in Alabama - although we closed on our house in Colorado Springs this week. Yea! I'm getting antsy to move into the house and start on some of the projects I've been planning all summer. I'm also anxious to reunite H with some of his things that I feel like he would really enjoy now (the bumbo and the johnny jump up). I'm also trying not to wish away the time I have with my family though. I love seeing H with my parents and will be sad when its time to leave. Anyway, enough about that on to my crafty adventures...
Each week my husbands class gets together for an activity - this week it is a cookout. Even with a limited kitchen, I feel compelled to make something. I typed "no bake" into Pinterest and found some amazing options, but at the end of the day these Peanut Butter Bars caught my attention.

A trip to the commissary and 30 min later these suckers were in the refrigerator hardening for tomorrow's cook out. I followed the recipe exactly as directed on Six Sisters' blog. I added some crumbled Reece's on the top to add some texture. I froze the Reece's first so that when I smashed them they wouldn't get mushy. (Having limited kitchen supplies I used the PB jar to do the smashing.)
I can't say exactly how they turned out since I won't let anyone sample them quite yet - but my husband licked all the bowls and says they are delicious.
Tomorrow I plan to make a quinoa salad as well so that we have some side items - plus it will cancel out the PB Bars ... right?
Each week my husbands class gets together for an activity - this week it is a cookout. Even with a limited kitchen, I feel compelled to make something. I typed "no bake" into Pinterest and found some amazing options, but at the end of the day these Peanut Butter Bars caught my attention.

A trip to the commissary and 30 min later these suckers were in the refrigerator hardening for tomorrow's cook out. I followed the recipe exactly as directed on Six Sisters' blog. I added some crumbled Reece's on the top to add some texture. I froze the Reece's first so that when I smashed them they wouldn't get mushy. (Having limited kitchen supplies I used the PB jar to do the smashing.)
I can't say exactly how they turned out since I won't let anyone sample them quite yet - but my husband licked all the bowls and says they are delicious.
Tomorrow I plan to make a quinoa salad as well so that we have some side items - plus it will cancel out the PB Bars ... right?
Tuesday, July 10, 2012
Favorite Things: A Baby Shower Gift
| Favorite Things Baby Shower Gift. |
I'm sad to say I did not take a picture of the final product - but the picture above was what I had collected before I left Atlanta for the shower. We made a quick Target run for a few items once we arrived in Michigan. My sister also picked up a few adorable things from the Congressional Gift Shop. (She is a Congressional Staffer and K and I spent many summers in DC, so it was a nice personal touch.)
For each item, we created a little label out of a note card. I bought some scrapbook baby stickers to put on the note card, along with whose favorite thing it was (Mom, Dad or Baby) and something cute about the product. (For example: the card on the links read "Baby's favorite thing - I love to suck and chew on these plus they hold my toys so they don't fall on the floor. You can never have enough.) I've actually used everything I gave her, so I could honestly recommend them.
The whole thing came together nicely and was really cute when she read them all out loud at the shower. I wrapped some of the items and left others completely unwrapped. I packed all the items into an L.L. Bean Tote with the new baby's name on it.
You could do this with your favorite things, but my bag included: the L.L. Bean Tote, Inch Bug Bottle Labels, Inch Bug Fabric Labels, nursing cover, a Gownie (to wear when she gets home, not at the hospital), Links, Stroller Toy, Extra Onesies, The Pantone Color Book, Art Cards, Arm & Hammer Trash Bags and Carrier, a lovie (sports themed to go with her nursery) and peepee teepees.
Now I just have to wait for K's little boy to make his arrival. Until then, here are a few of my favorite things up close and/or in use.
| My Favorite Baby Product! |
![]() |
| Art Cards! |
![]() |
| Pantone Color Book |
![]() |
| Monkie Lovie! |
Subscribe to:
Posts (Atom)