Those that read this blog and have come over to the house will know that my little mobile has been done and displayed in various stages for a while now.
The clouds are made of felt and were a great easy project for a movie night. (I have a hard time sitting still on the couch while we watch a movie.) The whole stringing them up as a mobile thing was a bit of a disaster.
I may be the crafter in the house but I am not the engineer. Last night I finally convinced my husband to redo the construction of the mobile. I left him with my box of crafting supplies while I took a bath. As I expected he nailed the construction - making sure it finally hung evenly over the changing table.
Just one more project - replacing the picture of Washington, DC with something more baby appropriate - and the nursery will be complete. Ok well we also need to get the crib from our friends..but one thing at a time.
Tuesday, January 31, 2012
Sunday, January 29, 2012
Bassinet Revisited
I've been having so much fun hanging out with the squadron ladies this week that I've neglected updating the blog. It's fitting though since my recent big project has been updating the bassinet cover. The bassinet is a hand me down from one of my favorite families in the squadron who got it as a hand me down from another former 461st family. We couldn't be more thrilled to be part of such a wonderful family.
Anyway, the bassinet came with a pattern for a short cover but while browsing the Internet I found a pattern on Etsy for a longer cover that I thought I would try.
It turned out quite well. I did ditch the hood because it got quite complicated. The pattern was designed for a hood with one support and this bassinet has two supports. We are intending to use the bassinet in our bedroom do a hood is not a necessity.
I'm glad to have it knocked off my to do list - although I intend to use the leftover fabric to make the missing bassinet sheet.
Just a few more little projects and I think I'll be done with the nursery!
Anyway, the bassinet came with a pattern for a short cover but while browsing the Internet I found a pattern on Etsy for a longer cover that I thought I would try.
It turned out quite well. I did ditch the hood because it got quite complicated. The pattern was designed for a hood with one support and this bassinet has two supports. We are intending to use the bassinet in our bedroom do a hood is not a necessity.
I'm glad to have it knocked off my to do list - although I intend to use the leftover fabric to make the missing bassinet sheet.
Just a few more little projects and I think I'll be done with the nursery!
Friday, January 20, 2012
Baby Shower, Nursery Decorating & Diaper Stacker
I was able to take home some of the decorations for the shower to decorate the nursery. We will only be in this house for a few months with the baby, so I wasn't planning on doing much decorating - however once I saw the adorable lanterns and pennant it didn't take much convincing. Plus with family and friends in town I didn't have to do much of the work. We still have lots of preparations to get done but the room is finally coming together.
As if all of that wasn't enough, I'm still working through my list of projects for the baby. I found a pattern for this Diaper Stacker. The directions were not as clear as I would have liked them to be (or perhaps its pregnancy brain) but I muddled through and turned out this adorable gem that will hang in the nursery. I don't have any diapers to put in it yet... that is an errand for another day.
Friday, December 30, 2011
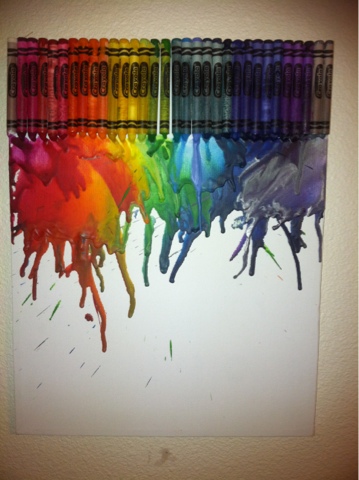
Melted Crayon Art
It's not the most original project - since it is all over Pinterest. With all those colors I just had to give it a try!
I had big plans for a grey, yellow and blue canvas - but the cr ayon box only has a few yellows and I started to get worried it would be too dark. I quickly decided a rainbow with more of my color palate included would be a better plan.
I also wanted to put some sort of print in the middle using painters tape. I had a cute airplane all taped on but as I started to use the hair dryer to melt the crayons the airplane peeled on the sides and I finally ended up pulling it off.
Also the hair dryer blows the wax all over the place - in directions you can't even fathom. I found holding it directly above the crayons was my best bet. Even better than the hair dryer was my heat embosser - it produced a centered stream of air that melted the crayons in a direction I could control.
Anyway, I love the outcome - here it is hanging on a random wall. I just had to decide now which way to hang it!
Lavender Sachets
Just before Christmas I was in need of a few sticking stuffers for my mom and sister. I had a few charm squares left over from various projects and had picked up some dried lavender from a farm on the coast so I figured I would make some sachets.
It could not have been easier. I sewed the charm squares together right sides facing each other. I left a small gap for turning and filling. As I was sewing the edges I placed a small piece of ribbon I'm the hem to create a small tag. I used the same ribbon to designate the set of three.
I turned all the squares, pushing out the corners with a chopstick. I filled each with a tablespoon of dried lavender and then a bit of fiber fill to round out the pillows. Each little sachet needs to be closed by hand. (Thats the annoying part I'm still getting a handle on.)
Each set of three will take you less than 30min so it's an easy project for those left over charm squares. There would make perfect housewarming or hostess gifts.
Easy Stylish Burp Cloths
Since I saw these on Petite Lemon Blog I wanted to give them a try. I'm always hesitant to try something new for a baby gift so, of course, I made a set for myself.
As usual I made a few alterations. I used scrap fabric instead of new fat quarters - you need about 6" x 18" for each cloth. I also used the ribbon to line the top and bottom of the cloth instead of down the side as the pattern called for. This allowed me to include a little ribbon loop so that I can attach the cloth to something if I want.
This is a really easy project. I used the cloth diapers I could find at the BX and I think next time I will look for a thicker diaper. They washed really nicely and are in the drawer ready to go. Now to make a few more for my pregnant friends!
Tuesday, December 20, 2011
Animal Pillows

I wanted to do the nursery in grey and yellow since I found out I was pregnant. It's been hard to find exactly what I want in those colors though...do making things seems to be my best option.
I had two Ikea pillows that have traveled with us since my college days. The covers were gross but the pillows were in great shape so they have been transformed with new covers. I used this easy tutorial to make an envelope pillow cover - there are many out there if you don't particularly like this one. Instead of using just one piece of fabric I used a different fabric on the back.
I appliquéd animals to the front echoing the pattern on the back - the back is the animal print from Kate Spain's Central Park that I used for the car seat cover. I drew the animals out on a piece of paper and traced it backwards on to interfacing which I ironed on to the fabric and cut it out. (Again many tutorials on applique are available) I used a simple envelope closure on the back of the pillow since they will mostly be decorative and don't need a zipper.
I'm always impressed by how challenging appliqué looks and yet how simple it really is. I don't want to go overboard with the animal theme but it does help bring a childish theme to the room.
And just because I can here is one more photo of the little grey elephant!

- Posted using BlogPress from my iPhone
Subscribe to:
Posts (Atom)